Brew Day tab
Start brew day, deduct ingredients from inventory, log mash, boil and fermenter measurements against their targets, and compare the recipe with your actual batch.
The Brew Day tab is what you keep open at the kettle. It shows the date, whether your ingredients are in stock, and one row per measurement with the recipe's target next to it. As you log values, BrewForge works out efficiency, volumes and losses and compares the batch with the recipe.
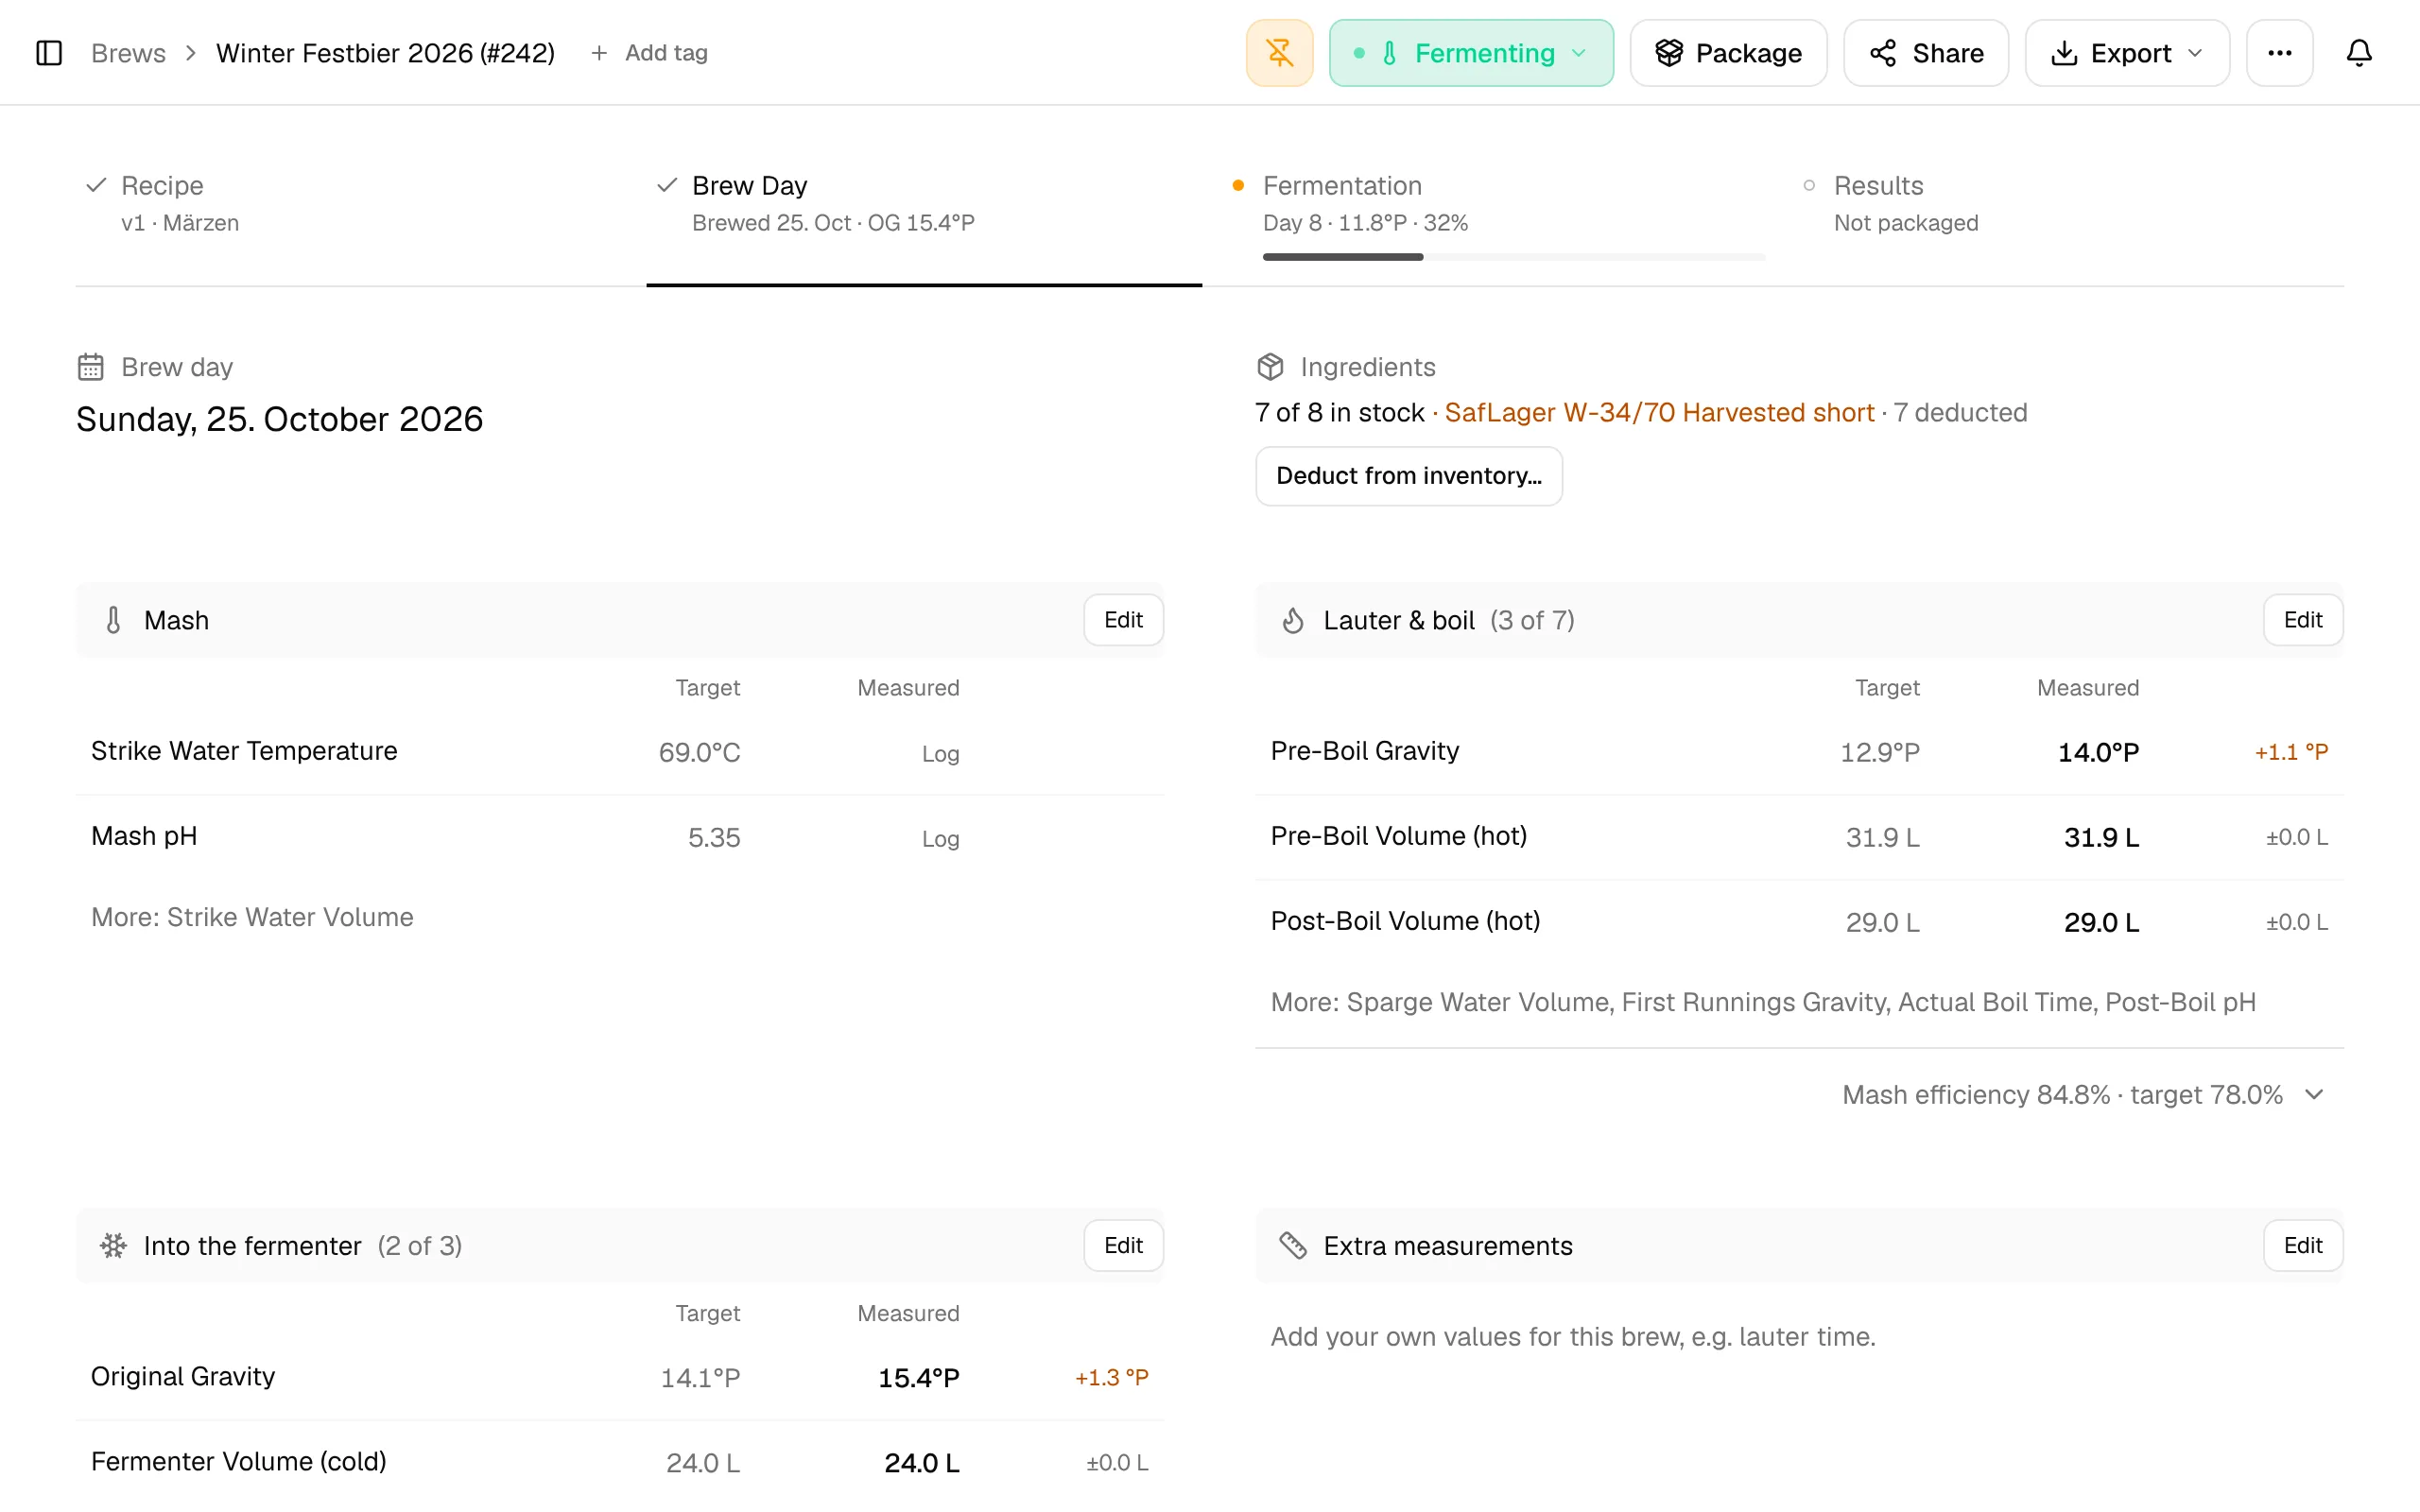
Dates and starting brew day
Before you brew (status Idea or Planned), the top left shows the Planned brew day. Click the date (or Set a date) to pick one in a calendar. Moving the brew day also moves its planned fermentation schedule, and with the cellar it offers to move the brew's planned cellar stays too. Setting a date on an Idea makes it Planned and gives it its batch number.
On brew day, click Start Brew Day. The brew moves to the status Brew Day and today becomes its brew date. Once you have brewed, the block shows the Brew day instead. If you brewed on another day than planned, it shows Originally planned with the old date, and Match actual sets the planned date to the real one.
When the wort is in the fermenter, click Complete Brew Day at the bottom of the tab. The brew moves to Fermenting and the Fermentation tab takes over.
Plan back from a ready-by date
Need the beer for a party, a festival or a holiday? Instead of guessing the brew day, tell BrewForge when the beer must be ready, and it works out the latest day you can brew. "Ready" means fermentation and conditioning are done.
On the Brew Day tab of an idea or a planned brew, click the planned date (or Set a date). The dialog's subtitle says how long the recipe takes, for example 21 days from brew day to ready.
Switch from Brew day to Ready by and pick the date the beer must be ready. BrewForge sets the brew day to the latest day that fits and shows it, for example Ready by 19. Dec → brew on 28. Nov.
Optionally enter an Occasion (Christmas party, up to 120 characters). It shows next to the date on the brew page and in the calendar.
Click Save. The brew keeps the ready-by date and the brew day. An idea with a brew day becomes Planned, as with any planned date.
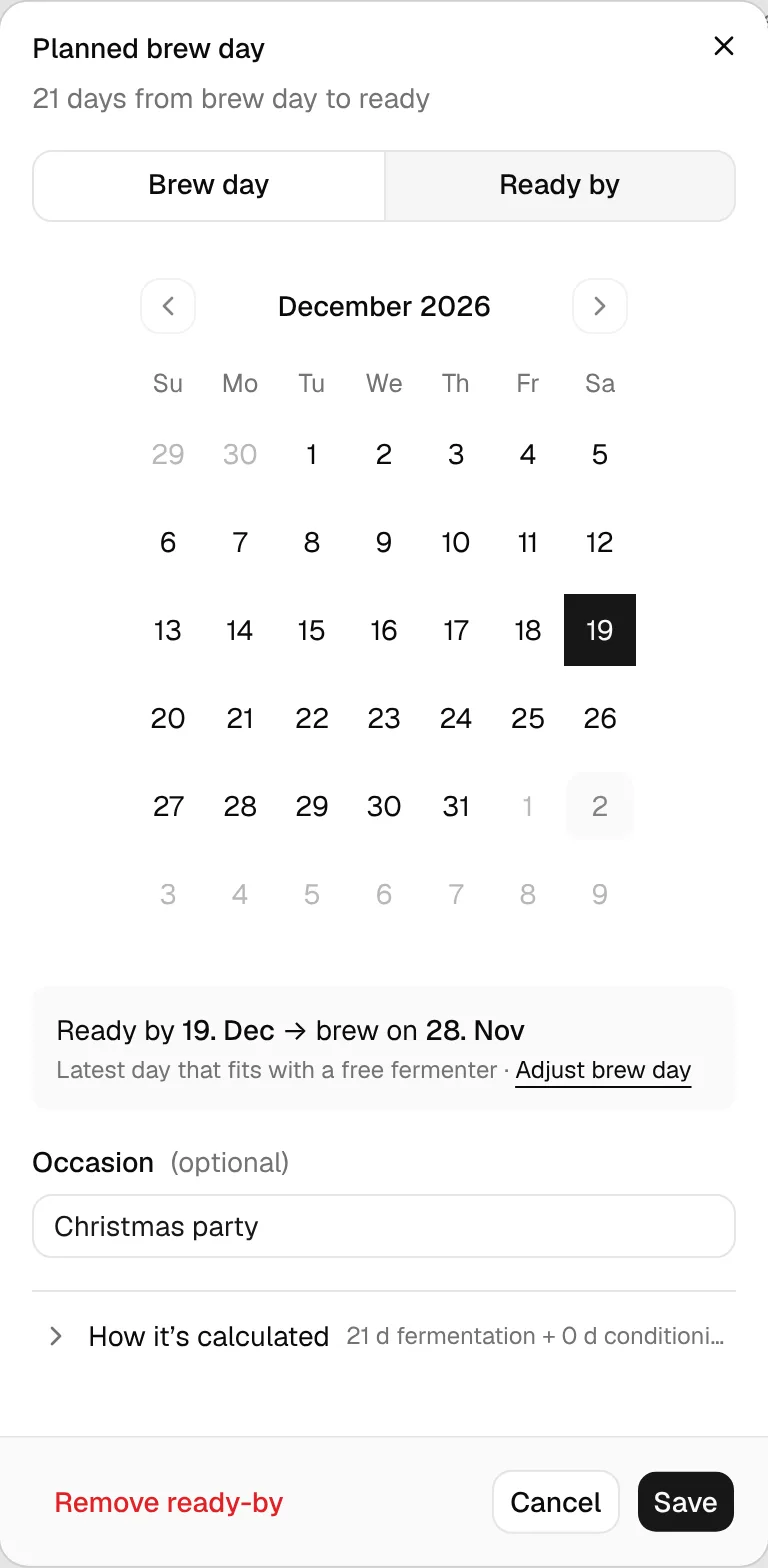
With the cellar (Pro plan) and at least one vessel, the suggestion also checks that a fermenter is free: it takes the latest day on which a fermenter can take the brew's first step (Latest day that fits with a free fermenter). If even today is too late, BrewForge suggests today and says how many days late the beer will be (Too late even if you brew today: 3 days late).
How it's calculated at the bottom of the dialog lists the fermentation stages and the conditioning time it counts back from the ready-by date (see the formula below).
Pick your own brew day
You don't have to brew on the latest day. Click Adjust brew day (or switch back to Brew day): the calendar now shades every day from today up to the latest brew day in green (In time, or In time, fermenter free with the cellar) and outlines the latest brew day. Click a day and the box below says when the beer will be ready and how many days before the ready-by date, for example Brew on 21. Nov → ready 12. Dec · 7 days before 19. Dec · Christmas party. A day after the window shows the result in amber (3 days after 19. Dec), and no fermenter free that day warns about a busy cellar.
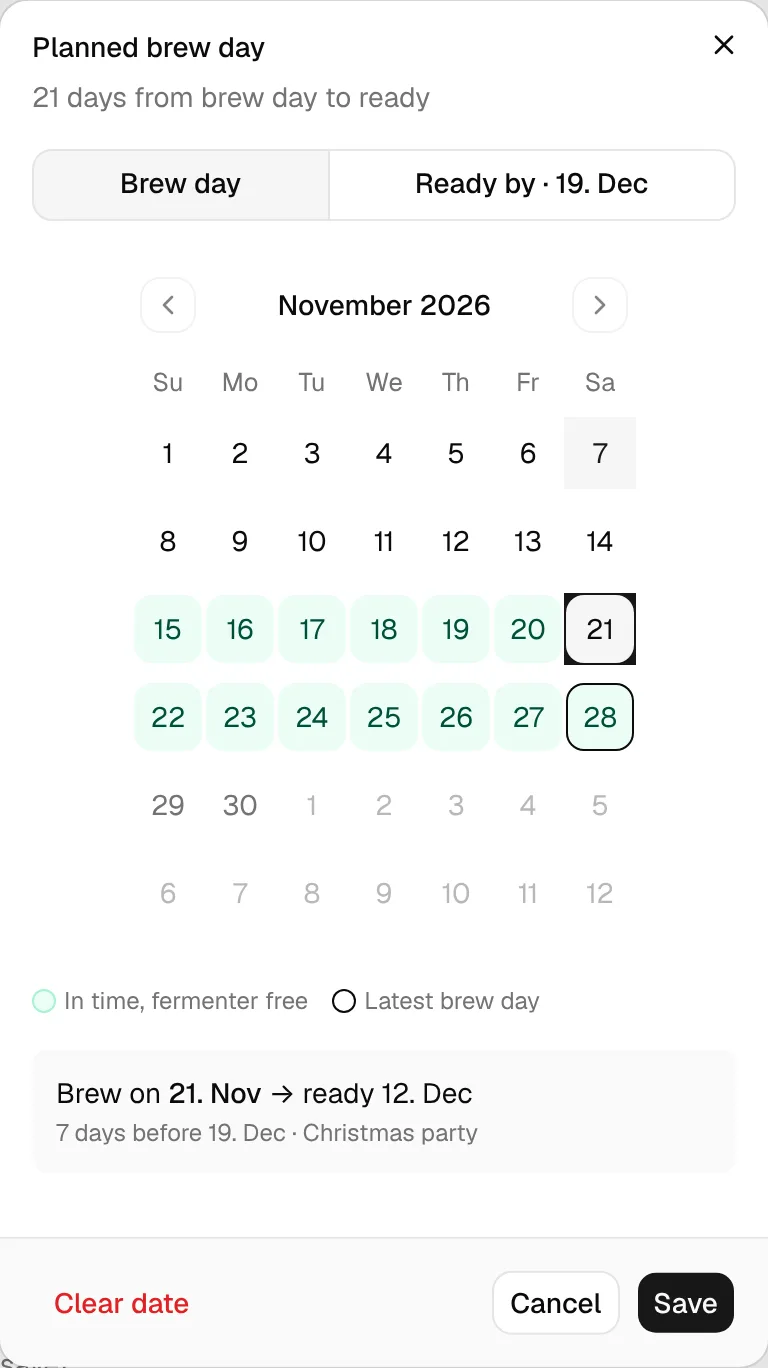
The switch then reads Ready by · 19. Dec, so you can see the date is still set. Setting the brew day by hand never changes the ready-by date, and changing the ready-by date always suggests a new brew day; adjust it afterwards if you want another one.
Remove ready-by (in Ready by mode) deletes the ready-by date and the occasion; the brew day stays. Clear date (in Brew day mode) removes only the brew day.
The ready-by line on the brew page
Once a ready-by date is set, one line under the brew day keeps you posted:
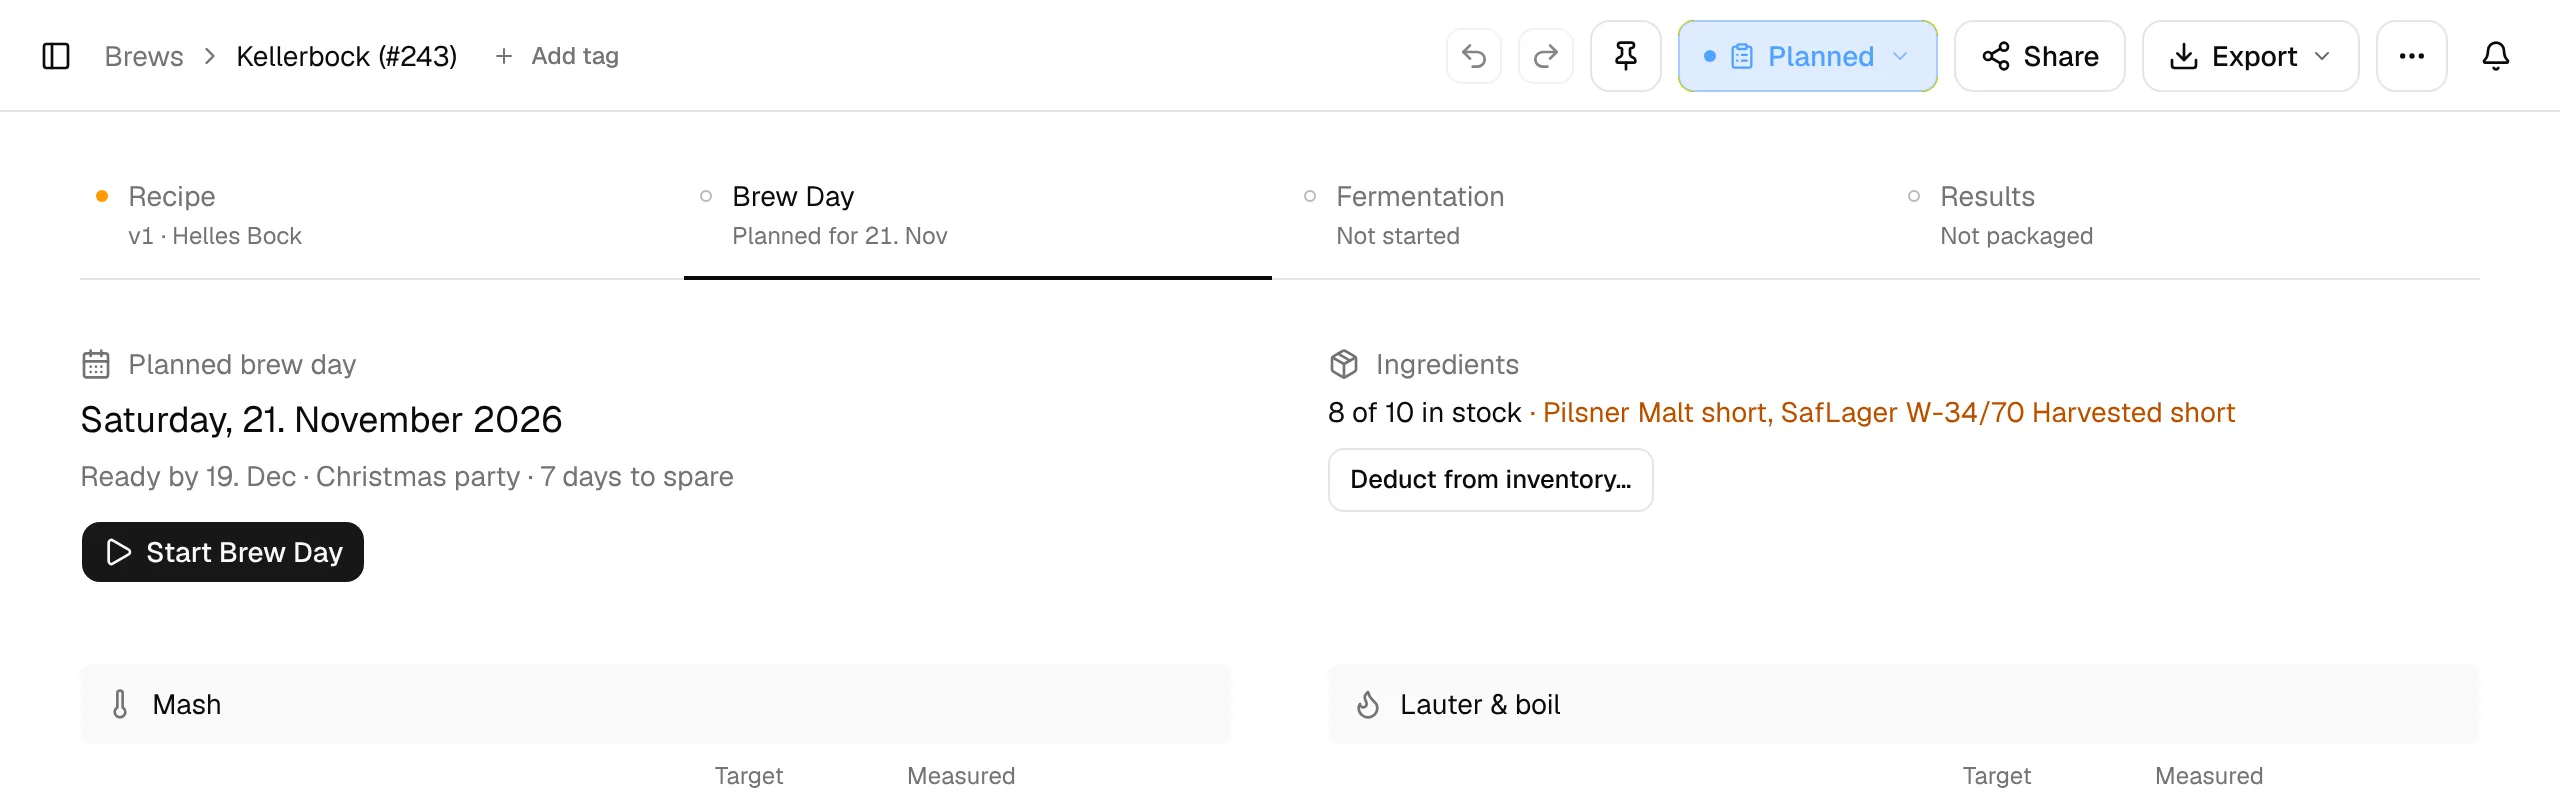
- Before brewing: Ready by 19. Dec · Christmas party · 7 days to spare. Without a brew day it says the latest day to brew: Ready by 19. Dec · brew by 28. Nov.
- Too late: an amber line such as Ready 22. Dec, 3 days after 19. Dec. with Move to 28. Nov, which moves the planned brew day to the latest brew day (it is offered while that day is not in the past).
- After brewing: the forecast from the actual brew day, for example Ready by 19. Dec · conditioned 12. Dec, 7 days to spare. Once you record the start of conditioning, the forecast counts the remaining conditioning from that day. If the beer will be late, the line turns amber (Conditioned 22. Dec, 3 days after the ready-by date 19. Dec.).
- Completed brews no longer show the line.
If the recipe has neither fermentation stages nor a total conditioning time, BrewForge can't count back. The dialog asks you to add a fermentation profile, and the line only shows the date (Ready by 19. Dec).
You set or change the ready-by date while the brew is an idea or planned. Late plans also appear under things to check in the brew list, and the ready-by date and the latest brew day appear in the calendar. You can also start a new brew for a date from the calendar. In the API a brew has the fields readyByDate and readyByNote.
days to ready = fermentation days + conditioning days
latest brew day = ready-by date − days to ready
fermentation days = the sum of all primary, secondary and tertiary stages of the recipe's fermentation schedule, each counted as its duration plus its ramp time rounded up to whole days (duration + ⌈ramp hours / 24⌉), rounded up to whole days.
conditioning days = the recipe's total conditioning time (⋯ → Carbonation & conditioning in the recipe's fermentation section) or, if that is empty, the sum of its cold crash, conditioning and carbonation stages, rounded up to whole days. A cold crash counts as conditioning: fermentation is over, the beer clears (the cellar plans it the same way).
ready = brew day + days to ready; after you start conditioning, ready = conditioning start + conditioning days. Days to spare = ready-by date − ready; a negative number means late.
Example: Primary 7 days with a 2-hour ramp (8), diacetyl rest 7 days with a 4-hour ramp (8) → 16 fermentation days, then a cold crash of 3 days with a 48-hour ramp (5). With 28 days of total conditioning, the beer needs 44 days, so for a ready-by date of 19 December the latest brew day is 5 November. Without a total conditioning time the cold crash is the conditioning: 21 days, latest brew day 28 November.
All dates are calendar days. Today is your local day.
Ingredients and inventory
The Ingredients block checks the recipe against your inventory: for example "9 of 10 in stock · SafLager W-34/70 short". It also counts what is on order in open orders and what you have already deducted.
Deduct from inventory… opens a checklist grouped into Fermentables, Hops, Yeast and Other (miscs and water salts). Nothing is deducted automatically and nothing happens when the status changes; you decide.
Tick the ingredients you used. Rows marked Not in inventory can't be ticked; not enough means the chosen lot holds less than the recipe needs.
If an ingredient has several lots, pick one under Select lot. The first lot is preselected; the right column shows how much it holds.
Click Deduct with the number of selected rows. The stock is reduced and the lot's cost is stored with the brew. Undo deduction on a row puts the amount back.
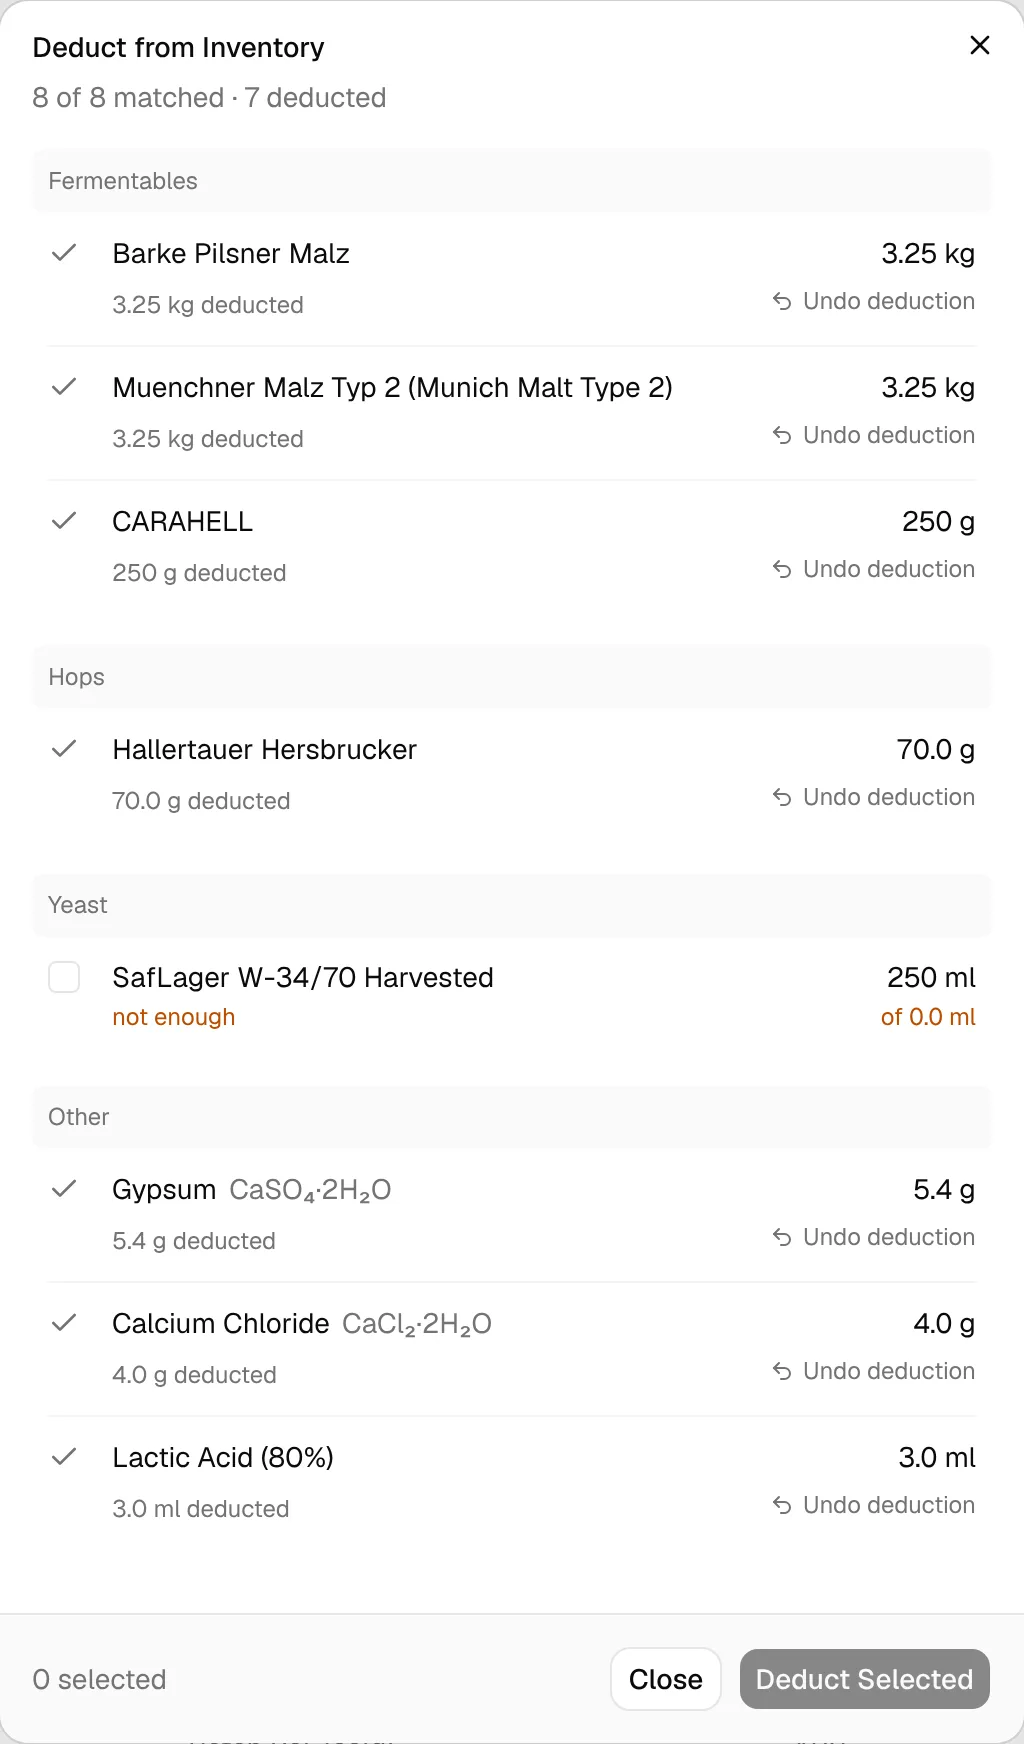
How rows are matched: amounts of the same ingredient are added up (two Saaz additions become one row). Fermentables match by name, hops by name, form (pellet unless set otherwise) and an alpha acid within ±0.5 percentage points of the recipe's.
Measurements
The measurements are grouped in the order you take them: Mash, Lauter & boil and Into the fermenter. Each row shows the Target from the recipe, the Measured value and the difference. Click a row (it says Log while empty) to enter one value, or click Edit on a section to fill all of its fields at once. Leave a field empty if you didn't measure it.
| Section | Always shown | Under More: until you log them |
|---|---|---|
| Mash | Strike Water Temperature, Mash pH | Strike Water Volume |
| Lauter & boil | Pre-Boil Gravity, Pre-Boil Volume (hot) | Sparge Water Volume, First Runnings Gravity, Actual Boil Time, Post-Boil Volume (hot), Post-Boil pH |
| Into the fermenter | Original Gravity, Fermenter Volume (cold) | Pitching Temperature |
If the recipe tops up the fermenter with water, Into the fermenter also asks for Pre-Dilution OG and Pre-Dilution Volume, measured before the water goes in.
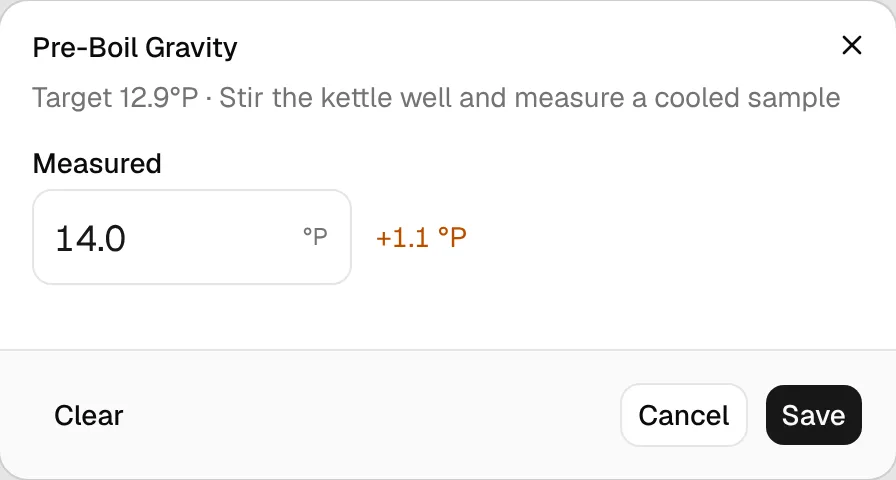
The difference turns amber when it is outside the tolerance:
| Value | Counts as on target within |
|---|---|
| Gravity | ±0.002 SG (about 0.5 °P) |
| Volume | ±3 % of the target |
| Temperature | ±1 °C |
| pH | ±0.1 (a mash pH between 5.2 and 5.6 always counts as fine) |
| Boil time | ±5 % |
Below the sections, BrewForge sums up what the values mean: Mash pH … · in range under Mash, and Mash efficiency … · target … under Lauter & boil once you have logged pre-boil gravity and volume. Expand it for pre-boil volume, boil-off, post-boil volume and mash efficiency with their differences.
Extra measurements
Extra measurements holds one-off values for this brew only, such as lauter time or the volume of a second runnings. Click Edit, then Add Field, and enter a name, a value and a unit. For fields you want on every brew, create custom fields with the placement Brew Day; they appear as their own section on this tab.
Recipe vs batch
As soon as you log a value, Recipe vs batch compares the plan with your batch. It shows OG, cold batch volume, ABV and your efficiency, each with the recipe value below it. Which efficiency leads follows Settings → General → Calculations → Efficiency (settings):
- International (default): Brewhouse efficiency, with the Sudhausausbeute in a muted line under it (SHA …).
- German (Sudhausausbeute): Sudhausausbeute, with the international values in a muted line under it (brewhouse … · mash …). The section title shows (SHA …) instead of (efficiency …).
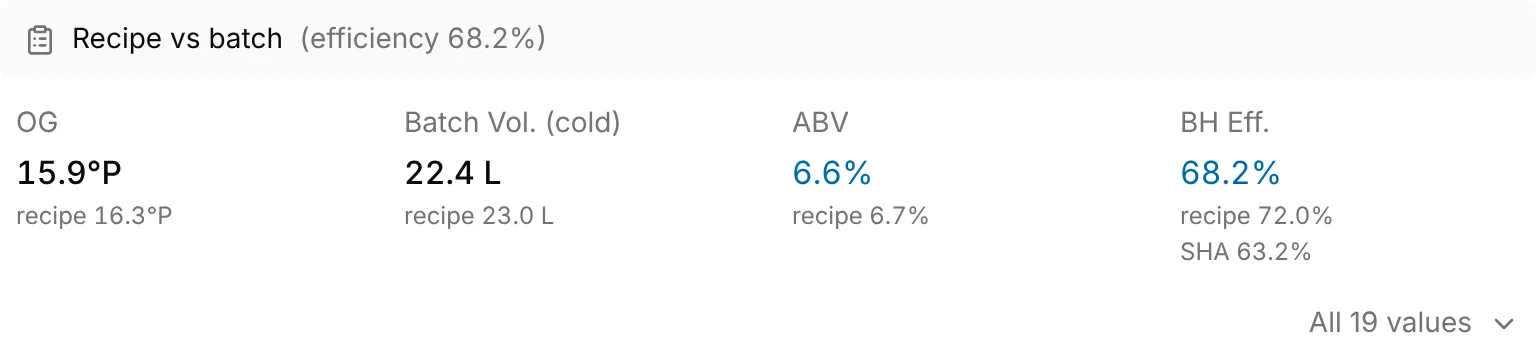
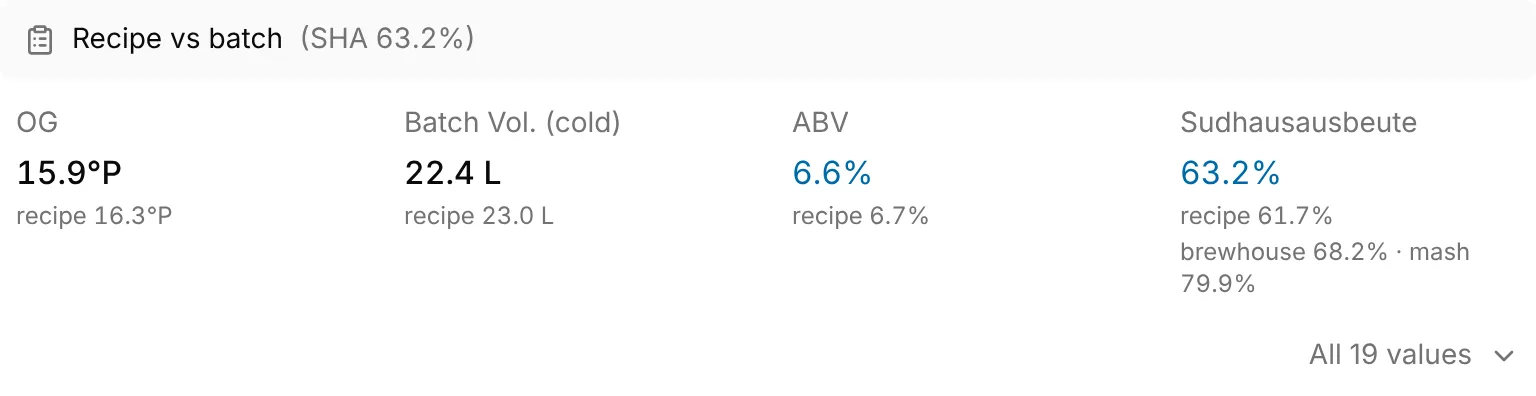
The batch's Sudhausausbeute comes from its measured mash efficiency (pre-boil gravity and volume), or else back from the brewhouse efficiency through the kettle loss, times the extract yield of the recipe's grain bill.
All … values opens the full table:
| Group | Values |
|---|---|
| Volumes | Pre-boil volume, boil-off per hour, post-boil volume, trub/chiller loss, to fermenter, cooling shrinkage, batch volume (cold), bottling volume |
| Gravity & alcohol | OG, FG, ABV, attenuation |
| Bitterness | IBU, BU:GU, RBR |
| Color | Color with swatches |
| Efficiency | Mash efficiency, brewhouse efficiency, Sudhausausbeute (first with the German setting) |
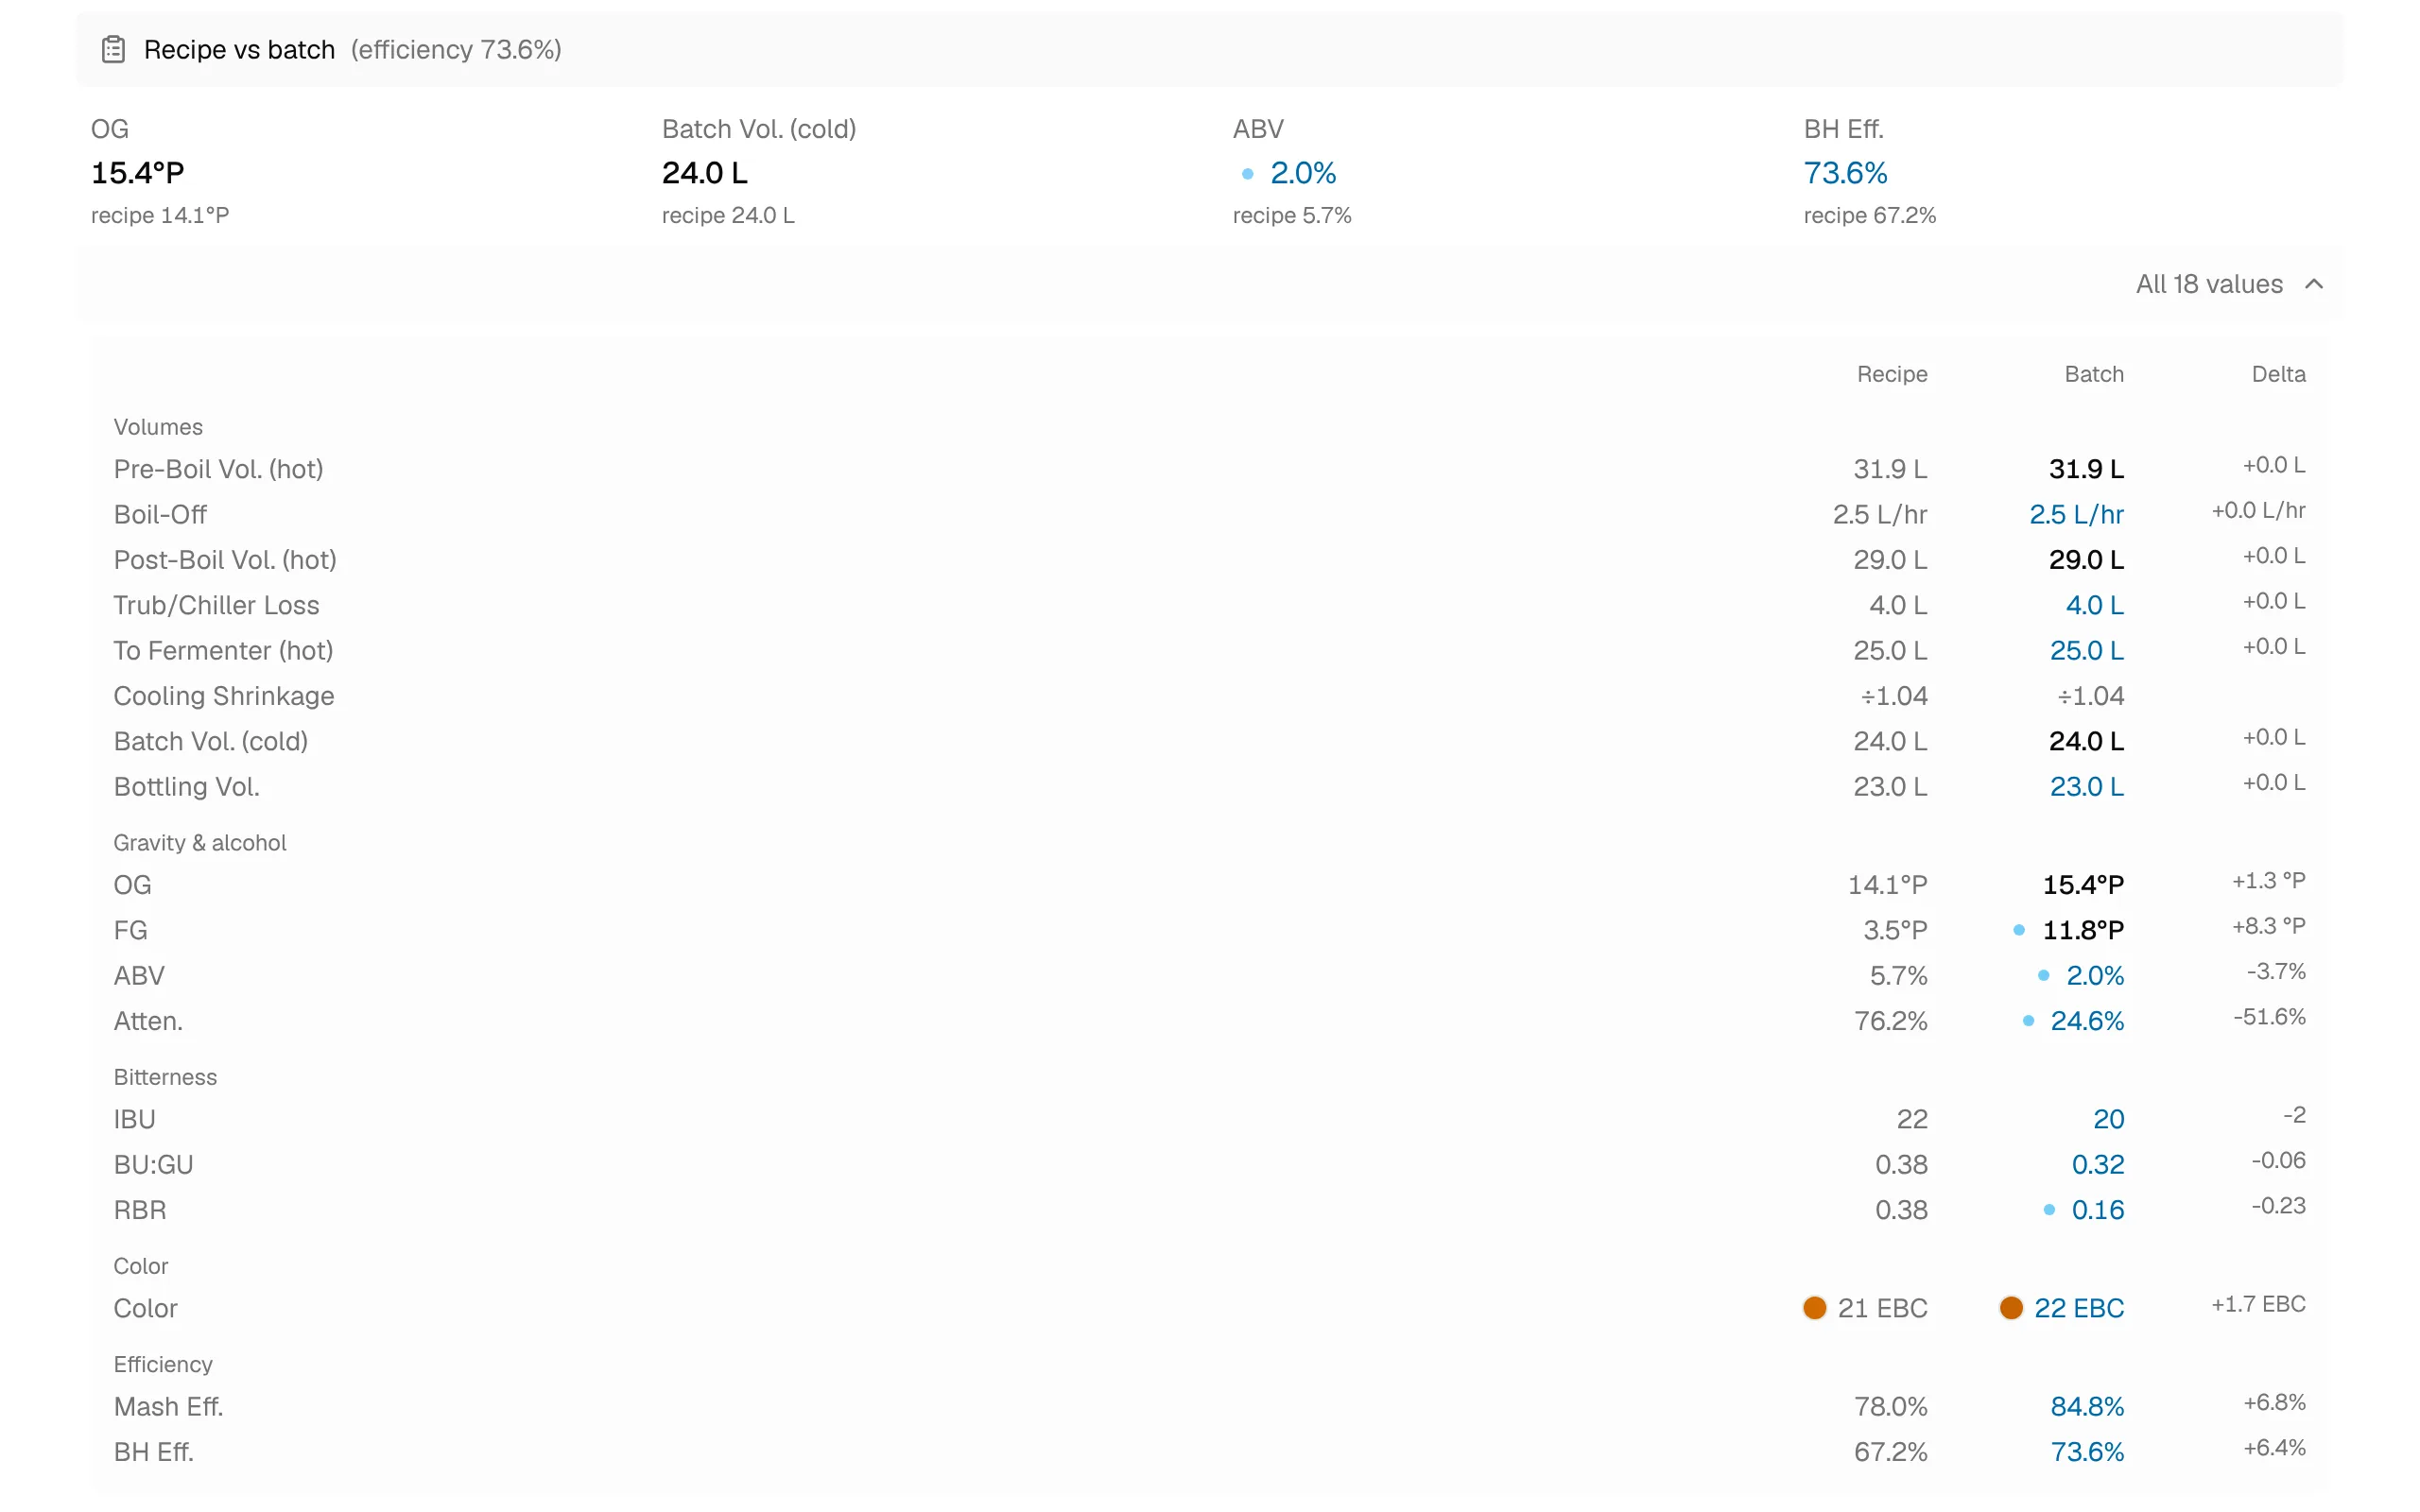
How to read the values:
- Bold: you measured it.
- Blue: calculated from your measurements along the brew day chain, for example the fermenter volume from the post-boil volume minus the planned trub loss.
- Italic blue: calculated with an assumption from your brew day calculation setting (below).
- Grey: taken from the recipe.
- A pulsing blue dot next to FG, ABV, attenuation and RBR: the brew is still fermenting and the values follow the latest gravity reading until you record the final gravity.
If you only measure part of the chain, BrewForge has to assume the rest. Settings → General → Calculations → When a brew day value is missing decides how: Keep efficiency (default) assumes your efficiency matched the recipe, so an OG alone gives you the fermenter volume, and a volume alone gives you the OG. Keep recipe value keeps the recipe's value instead. A note under the table says which assumption was made.
Use the comparison to tune your equipment profile: if your boil-off, losses or efficiency differ by the same amount on every brew, change the profile and the next recipe hits its targets.
See Brew calculations for the formulas behind efficiency, derived volumes and ABV.
Timeline
The timeline at the bottom of every tab collects notes, milestones and upcoming events. Notes you add on this tab are filed under the mash phase, for example "Stuck sparge, added rice hulls".
Print it
Export → Brew day sheet prints this tab in working order, with every target next to a field for the actual value. Values you already entered here are printed in. See PDF exports.