Equipment profiles
Describe your brewing system in BrewForge: batch size, mash tun, hot water tank, kettle and fermenter with their sizes and losses, efficiency, boil-off and hop stand, with the formulas behind every calculated value.
An equipment profile describes your brewing system. BrewForge uses it to calculate water volumes, the pre-boil volume, the gravity you will hit and the strike temperature, and to warn you when a recipe doesn't fit your vessels. Most homebrewers need one profile per system, or one per batch size.
Open Settings → Profiles, stay on the Equipment tab and click a profile, or create one with New equipment. If your system is one of the templates (Grainfather, Brewtools, BrewZilla, Anvil Foundry, Spike Solo, generic 3-vessel, BIAB and 5-gallon setups), add it with Browse templates and adjust it.
Volumes, weights and temperatures use the units from your settings.
Create equipment
New equipment opens a dialog in two steps:
- Setup: Start from New equipment or Copy of… (one of your profiles or a template), a Name, How you brew (Sparge or No sparge (BIAB)), the Batch volume and where it is Measured. A copy is created right after this step.
- Sizes: Boil time, the boil-off rate, the optional sizes of mash tun and kettle (Mash tun holds at most, Kettle holds at most) and the Brewhouse efficiency (72 % is a typical start; with the German setting the Sudhausausbeute, 60–65 % is typical for home brewing).
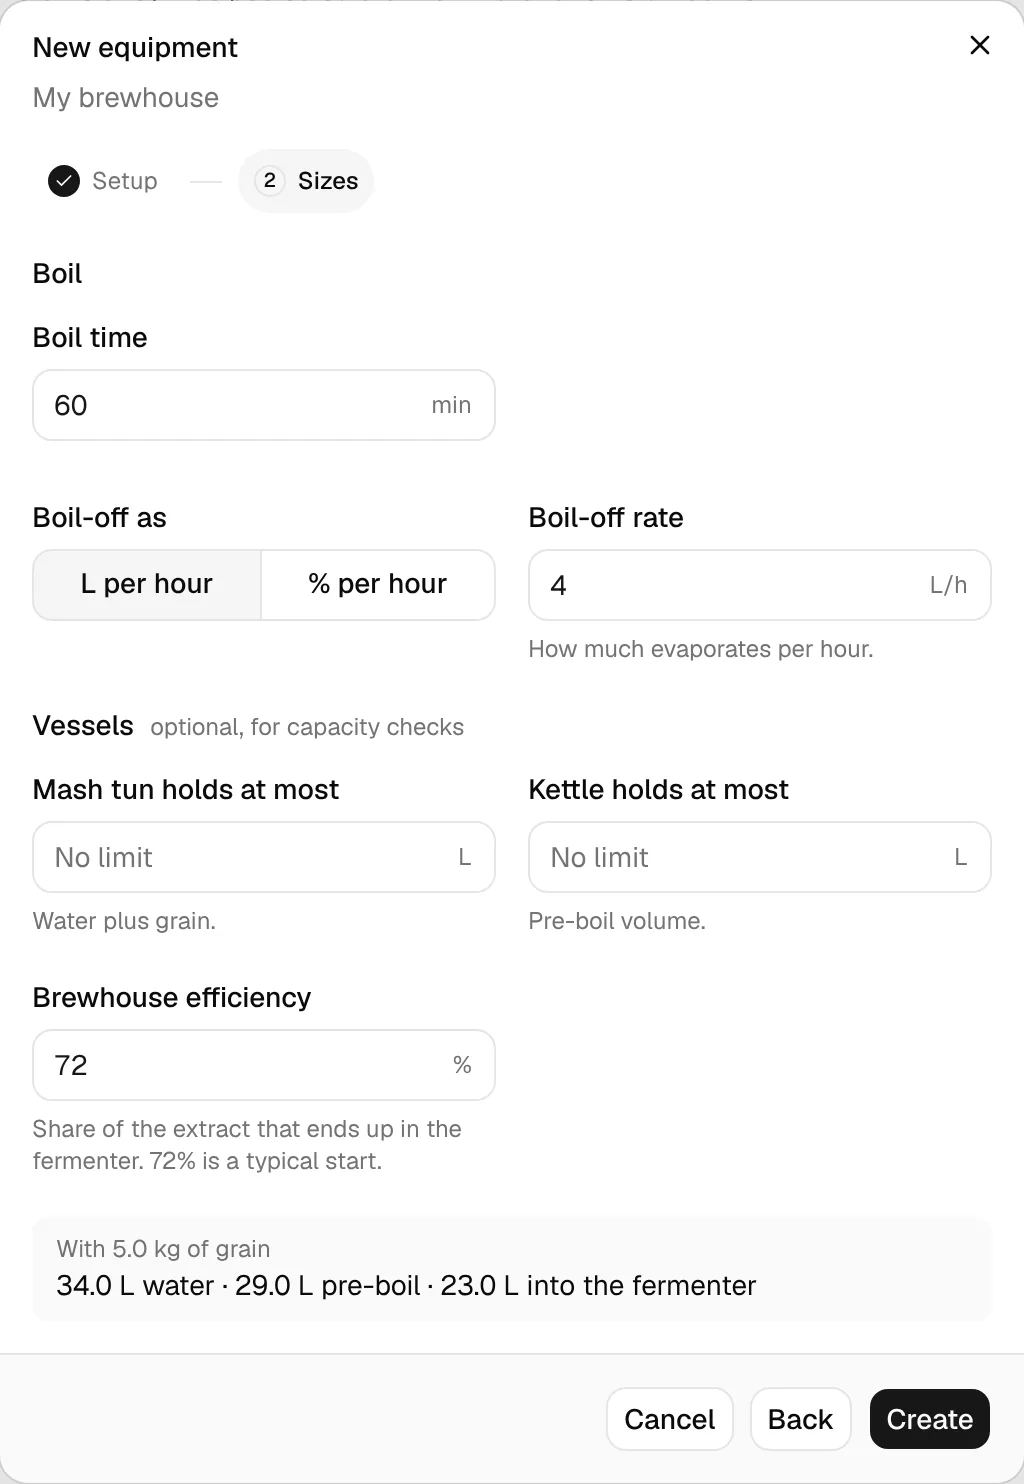
The grey box shows what the profile does with an example grist, and warns when the mash tun or the kettle is too small. Click Create to open the new profile.
The equipment page
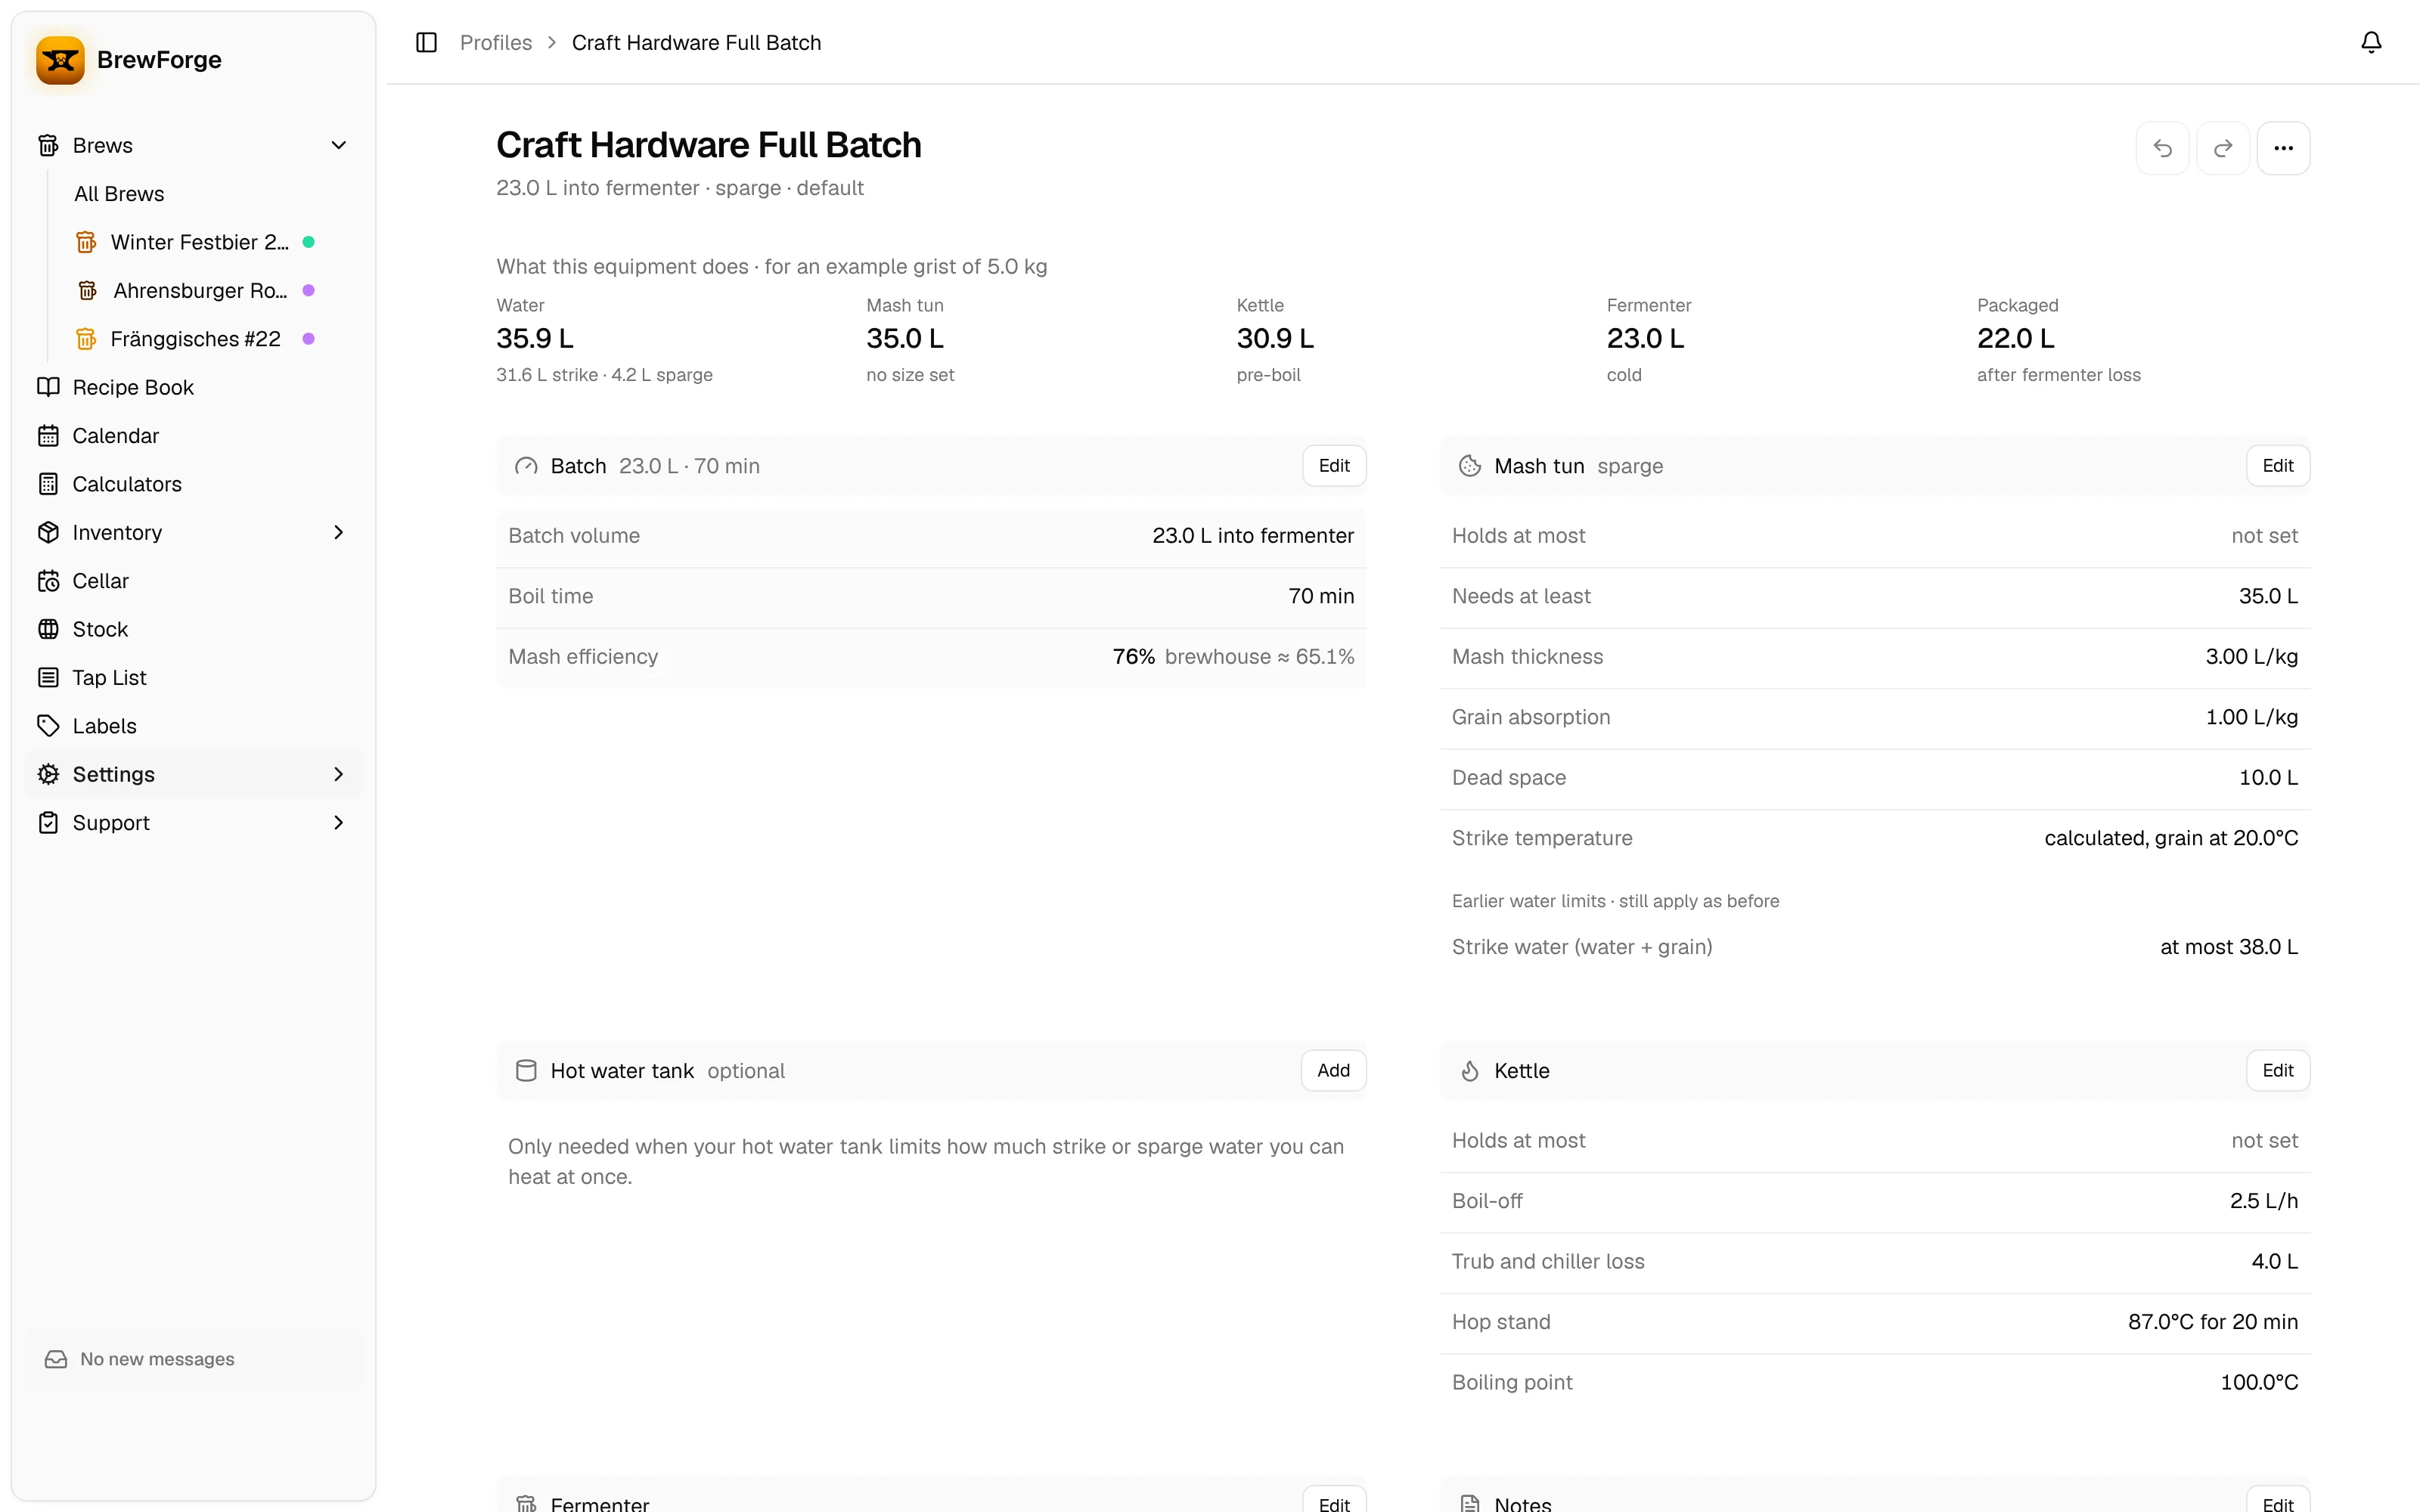
The line under the name shows the batch size, sparge or no sparge, and whether this is your default. Below it, What this equipment does follows an example grist through your system:
| Stage | Shows |
|---|---|
| Water | Total water, split into strike and sparge (or all into the mash without sparging) |
| Mash tun | Strike water plus grain, compared with the mash tun size |
| Kettle | The pre-boil volume, compared with the kettle size |
| Fermenter | The cold volume into the fermenter |
| Packaged | What is left after the fermenter loss |
When the mash tun has a size, the line also says at which grain weight it is full (mash tun full at …). If the boil-off would boil the kettle dry or a vessel overflows with the example grist, a line under the title lists the things to check; click one to open the right dialog.
example grist = batch volume (L) × 0.22 kg/L, rounded to 0.5 kg (at least 0.5 kg). That is roughly a 1.050 beer at 72 % efficiency.
With sparging, the mash tun is full at (holds at most − dead space) / (mash thickness + 0.67 L/kg). 0.67 L/kg is the volume one kilogram of crushed malt takes up in the mash.
Without sparging all the water goes into the mash: (holds at most − pre-boil volume − mash tun loss) / (grain absorption + 0.67 L/kg).
Example: 23 L batch → 23 × 0.22 = 5.06, rounded to 5.0 kg. A 40 L mash tun with 2 L dead space at 3 L/kg is full at (40 − 2) / 3.67 = 10.4 kg.
Below the flow there is one section per vessel, in brewing order. Each has an Edit button; click it or a row to change the values. Changes are saved right away.
Batch
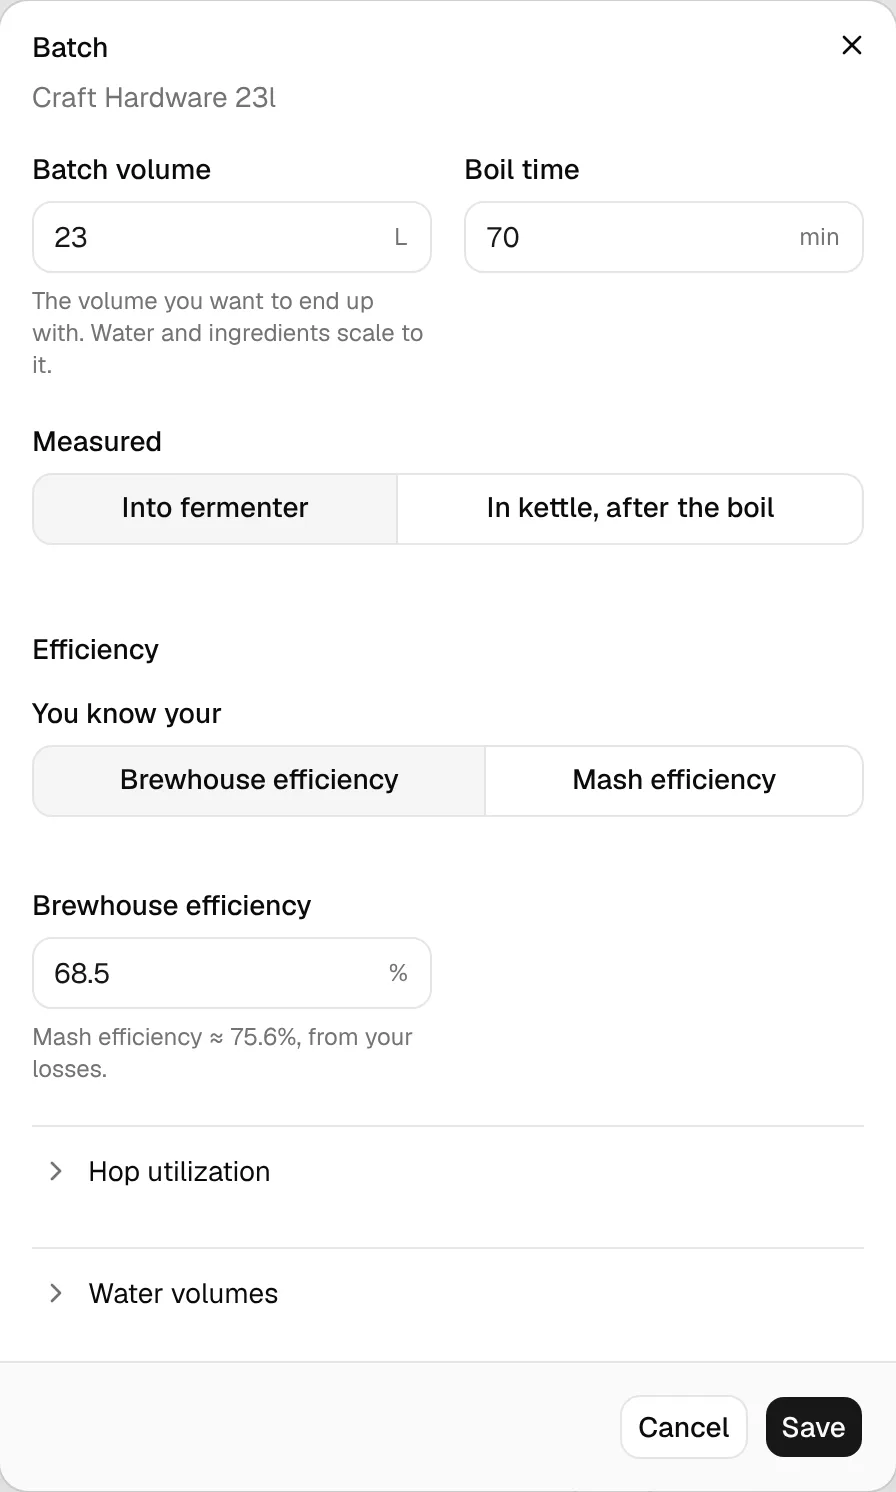
| Field | Meaning |
|---|---|
| Batch volume | The volume you want to end up with. Water amounts and ingredient scaling are based on it. |
| Measured | Where the batch volume is measured: Into fermenter (cold, after trub and chiller losses) or In kettle, after the boil (hot, at the end of the boil). |
| Boil time | Default boil time for recipes with this profile. |
| You know your | Whether you enter the Brewhouse efficiency or the Mash efficiency. BrewForge calculates the other one from your losses and shows it below the field. |
| Hop utilization | Scales all IBU calculations. 100 % uses the standard formulas; lower it if your beers taste less bitter than calculated. |
| Water volumes | Show strike and sparge water Cold (room temperature) or Hot, as you measure them in the kettle. |
- Brewhouse efficiency: the share of the grain's potential extract that ends up in the fermenter.
- Mash efficiency: the share that is dissolved in the wort before any losses after the boil.
The German Sudhausausbeute (extract in the cast-out wort per kg of grain) reads about 20 % lower than these values: roughly 0.8 × mash efficiency. If you think in Sudhausausbeute, switch Settings → General → Calculations → Efficiency to German (Sudhausausbeute). The profile list, the efficiency row on this page, the batch dialog (a single Sudhausausbeute field instead of You know your, with brewhouse and mash efficiency calculated below it) and New equipment then show and take the Sudhausausbeute. Equipment profiles have no grain bill, so BrewForge converts with the conventional 80 % extract yield; the profile keeps storing mash and brewhouse efficiency. See Efficiency: international or Sudhausausbeute for the formulas.
The boil only concentrates the wort, so the only sugar lost between kettle and fermenter is the wort left behind as trub:
conversion factor = (post-boil volume − trub/chiller loss) / post-boil volume
brewhouse efficiency = mash efficiency × conversion factor
mash efficiency = brewhouse efficiency / conversion factor
Both results are rounded to one decimal. The post-boil volume comes from the pre-boil formula in Kettle.
Example: post-boil 27.96 L, trub/chiller loss 4 L. Factor = 23.96 / 27.96 = 85.7 %. A mash efficiency of 76 % gives 76 × 0.857 = 65.1 % brewhouse efficiency.
Mash tun
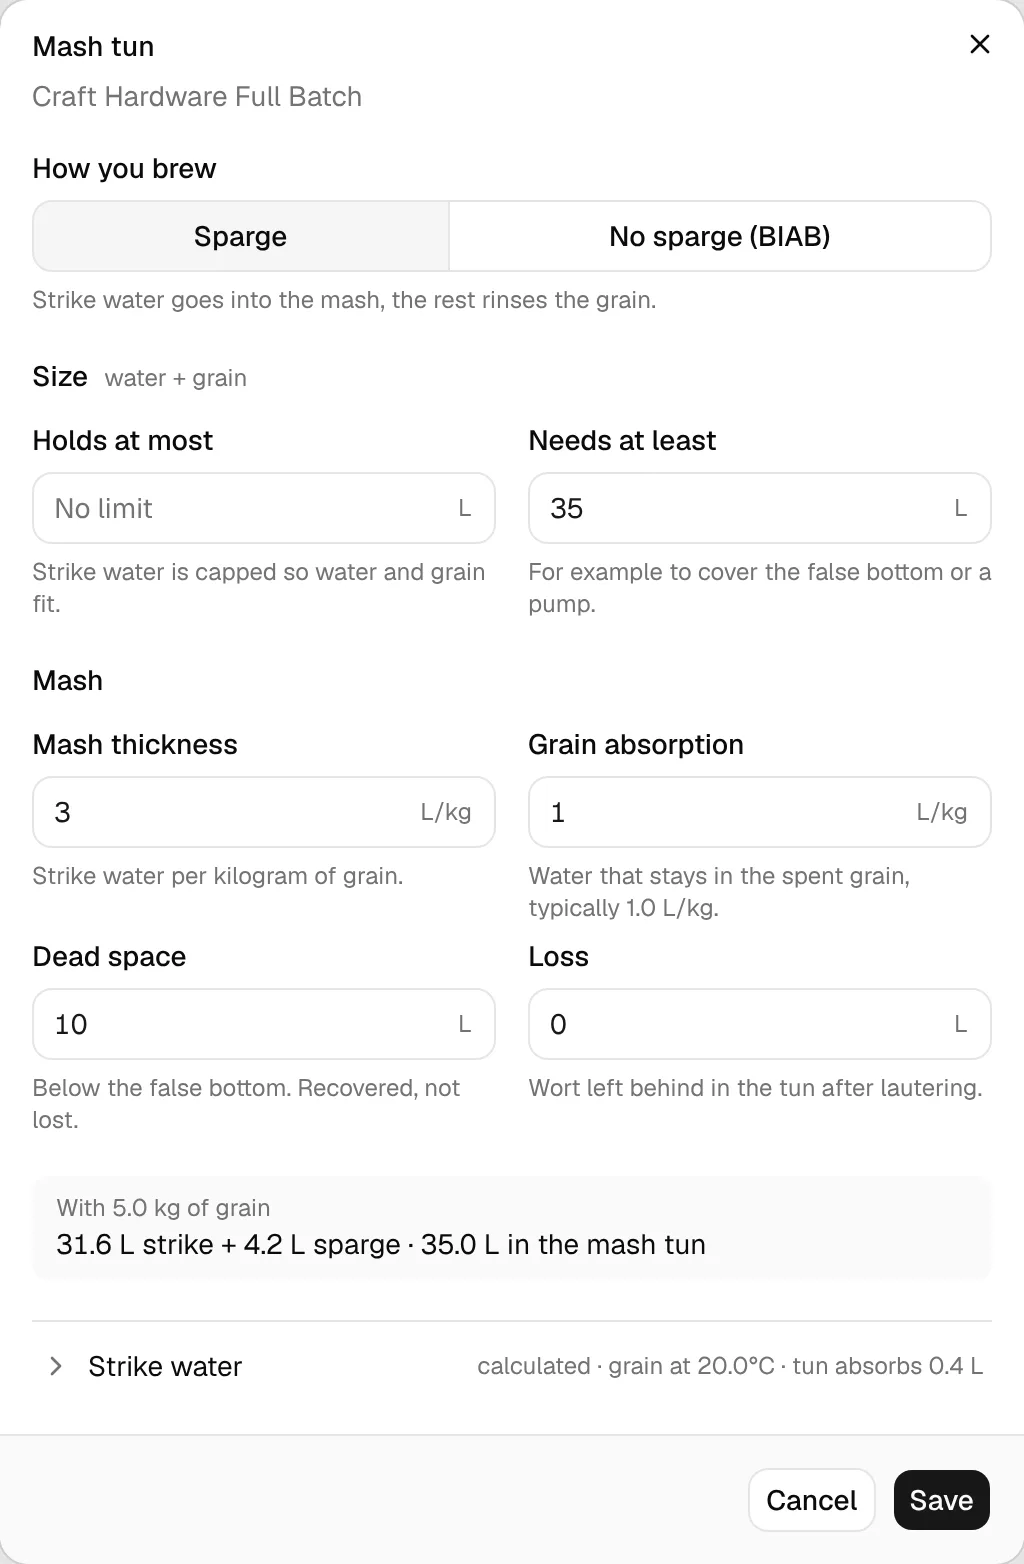
| Field | Meaning |
|---|---|
| How you brew | Sparge: strike water goes into the mash, the rest rinses the grain. No sparge (BIAB): all the water goes into the mash, for example brew in a bag. |
| Holds at most | The size of the mash tun, water plus grain. The strike water is capped so that water and grain fit. Empty means No limit. |
| Needs at least | The smallest fill, water plus grain, for example to cover the false bottom or a pump. The strike water is raised to reach it. |
| Mash thickness | Strike water per kilogram of grain, typically 2.5–4 L/kg. Higher values make a thinner mash. |
| Grain absorption | Water that stays in the spent grain, typically 1.0 L/kg (0.12 gal/lb). |
| Dead space | Liquid below the false bottom. It is recovered while lautering, not lost. |
| Loss | Wort left behind in the tun after lautering. |
The grey box shows strike and sparge water and the mash tun fill for the example grist, and warns when the mash doesn't fit.
Strike water
The fold Strike water at the bottom of the dialog holds:
- Calculate strike temperature: calculates the strike temperature for recipes with this profile from the rest temperature, grain temperature and the tun's heat capacity. Off means you set it by hand.
- Grain temperature: temperature of the grain at mash-in, usually room temperature.
- Sparge water temperature.
- Tun heat capacity: how much heat the mash tun takes from the strike water, as an equivalent water volume. 0 ignores it. Measure it… opens a short measurement.
Measure the tun's heat capacity
Measure the temperature of the empty mash tun (usually room temperature) and enter it as Tun temperature.
Heat a measured volume of water, enter it as Hot water and pour it into the tun.
Enter the water temperature right away as Water right away, close the lid, wait 5 minutes and enter the new temperature as Water after 5 min.
Click Use this value to copy the result into Tun heat capacity.
The heat the water loses is the heat the tun takes up:
heat capacity = hot water volume × (water temp at 0 min − water temp at 5 min) / (water temp at 5 min − tun temp)
The result is a water volume in your volume unit, rounded to 0.01. The water must cool down during the 5 minutes and stay warmer than the tun, otherwise no value is shown.
Example: 10 L at 100 °C cools to 97 °C in a tun at 20 °C: 10 × 3 / 77 = 0.39 L.
Hot water tank
The hot water tank is optional. Only add it (Add) when your tank limits how much water you can heat at once.
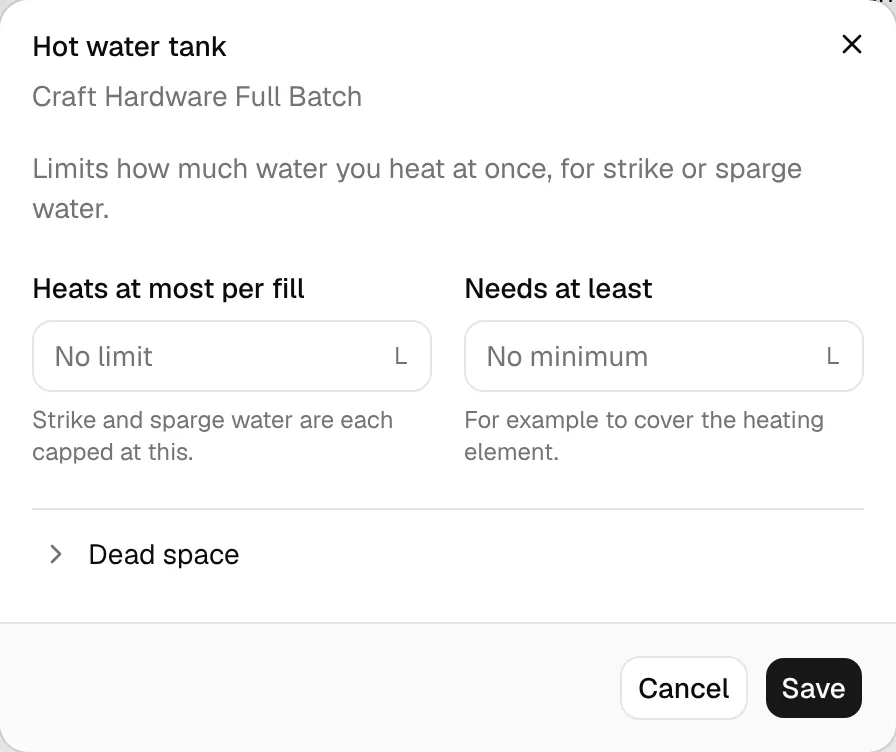
| Field | Meaning |
|---|---|
| Heats at most per fill | Strike water and sparge water are each capped at this volume. |
| Needs at least | The smallest fill, for example to cover the heating element. Strike and sparge water are each raised to it. |
| Dead space | Water left below the tap. It is saved with the profile but not part of the water calculation yet. |
Remove limits clears the tank again.
The strike water starts from the mash thickness: strike water = kg grain × mash thickness + dead space. Then every limit that applies is checked, and the strictest one wins:
strike water ≤ min(holds at most − grain volume, heats at most per fill)
strike water ≥ max(needs at least (mash tun) − grain volume, needs at least (tank))
grain volume = kg grain × 0.67 L/kg. The sparge water is limited by the hot water tank in the same way. The recipe's water section names the limit that changed the strike water, for example Strike water limited by mash tun capacity or Strike water limited by hot water tank size.
Example: 5 kg of grain, 3 L/kg, 10 L dead space, mash tun Needs at least 35 L. Strike water from the ratio: 5 × 3 + 10 = 25 L. Minimum: 35 − 5 × 0.67 = 31.65 L, so the strike water is raised to 31.6 L and the mash tun holds 35 L.
Earlier water limits
Profiles created with the old equipment form can have strike and sparge water limits that don't belong to one vessel. They show under the mash tun or the hot water tank as Earlier water limits · still apply as before and keep calculating exactly as before, so your water amounts don't change.
Click them to move them onto the vessels: limits that include grain become the mash tun size, water-only limits become one hot water tank limit, and the stricter value then applies to both strike and sparge water. The dialog shows the strike and sparge water for the example grist Now and After moving before you click Move to vessels. Recipes and brews keep their own copy of the values until you apply the profile to them.
Kettle
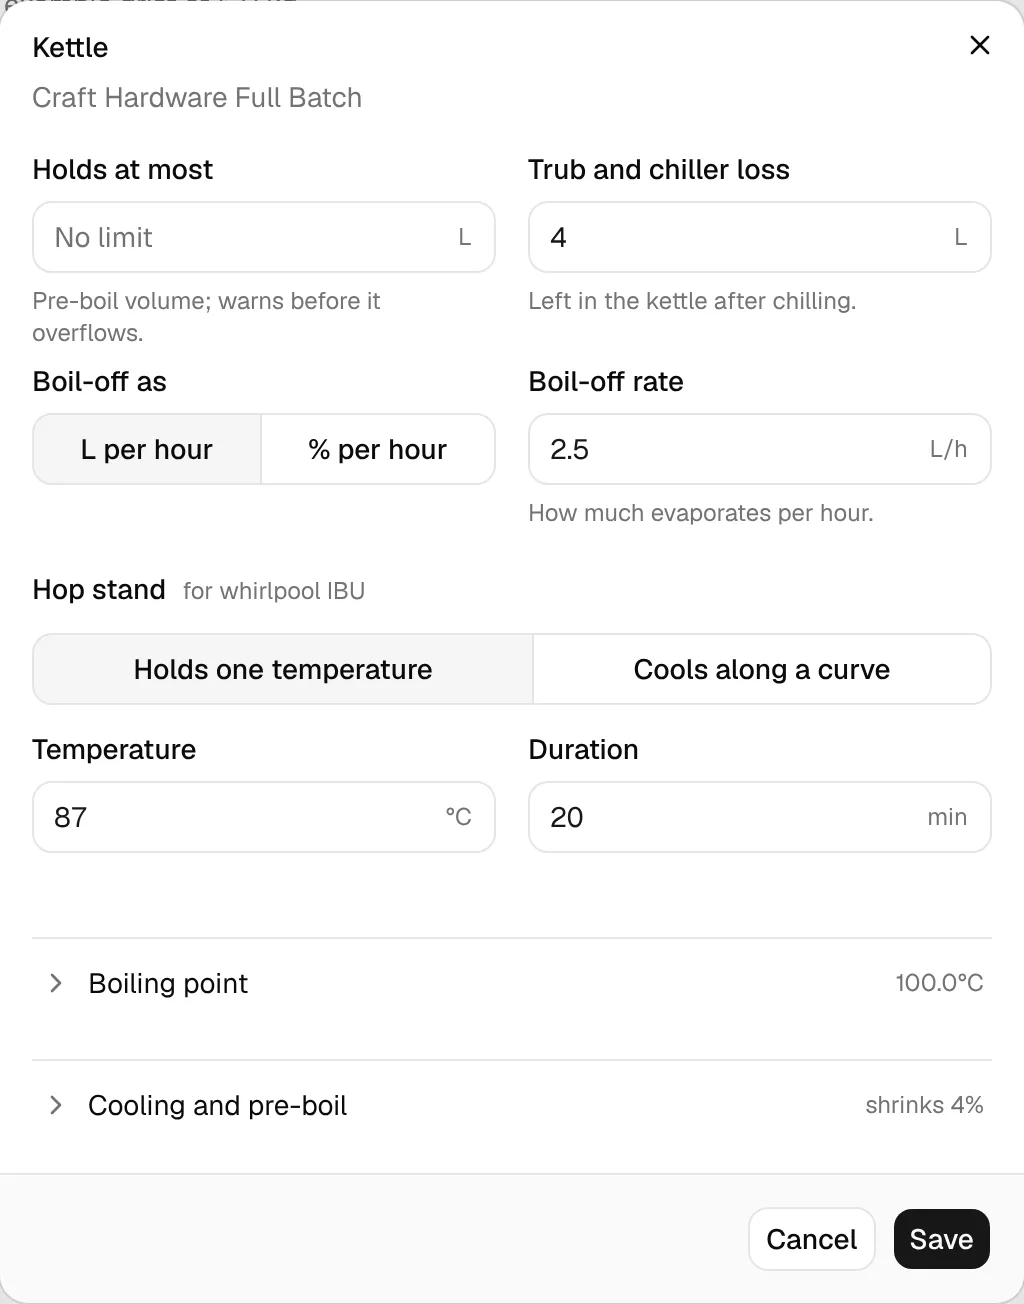
| Field | Meaning |
|---|---|
| Holds at most | The largest pre-boil volume your kettle holds. BrewForge warns before it overflows. |
| Trub and chiller loss | Wort left in the kettle after chilling (hops, protein, chiller). It doesn't reach the fermenter. |
| Boil-off as / Boil-off rate | How much evaporates per hour, as a volume (for example 3–5 L/h) or as % per hour of the pre-boil volume. Switching converts the rate so the boil-off stays the same. The total must stay below 100 %. |
| Hop stand | For whirlpool IBU: Holds one temperature (a flat Temperature for a Duration) or Cools along a curve (pick a hop stand curve, edit it or create a New curve). |
| Boiling point | Altitude sets the boiling point; change the Boiling point if you measured it. |
| Cooling and pre-boil | Cooling shrinkage, how much the wort contracts from boiling to pitching temperature (typically 4 %), and an optional Fixed pre-boil volume. Empty means it is calculated. |
First BrewForge works out the volume at the end of the boil (hot, in the kettle):
- In kettle, after the boil:
post-boil volume = batch volume - Into fermenter:
post-boil volume = (batch volume − top-up water) / (1 − cooling shrinkage / 100) + trub and chiller loss
Then it adds the boil-off:
- per hour as a volume:
pre-boil volume = post-boil volume + boil-off rate × boil time / 60 - % per hour:
pre-boil volume = post-boil volume / (1 − rate / 100 × boil time / 60)
A percentage rate is applied linearly over the whole boil, not compounded. A Fixed pre-boil volume replaces the calculated one.
Example: 23 L into the fermenter, 4 % cooling shrinkage, 4 L trub and chiller loss, 2.5 L/h for 70 minutes. Post-boil: 23 / 0.96 + 4 = 27.96 L. Pre-boil: 27.96 + 2.5 × 70 / 60 = 30.9 L. With 8 %/h instead, the boil removes 8 × 70 / 60 = 9.33 % and the pre-boil volume is 27.96 / (1 − 0.0933) = 30.8 L.
When you switch between the two modes, BrewForge keeps the loss for the current setup: L/h = loss / (boil time / 60) and %/h = loss / pre-boil volume / (boil time / 60) × 100.
boiling point (°C) = 100 − altitude (m) × 0.0034
Rounded to 0.1 °C. Example: at 500 m, 100 − 1.7 = 98.3 °C.
Fermenter
| Field | Meaning |
|---|---|
| Loss | Volume left behind in the fermenter (yeast cake, trub). It reduces the packaged volume. |
| Top-up water | Water added after the boil. You brew that much less wort. |
Notes
Edit in the Notes section opens Name and notes: rename the profile and add free text (up to 500 characters), for example which pump or chiller you use.