Custom brew fields
Add your own typed fields to BrewForge brews and brew notes, such as a lab report link, a mash pH reading or a keg number.
BrewForge covers the usual brewing data, but every brewery tracks something extra: a lab report link, the keg a batch went into, a water source, a sensory score. Custom fields let you define those fields once. They then appear on every brew (or every brew note) for you to fill in, and integrations can read them through the API.

Create a field
Open Settings, switch to the Custom fields tab and click Add field.
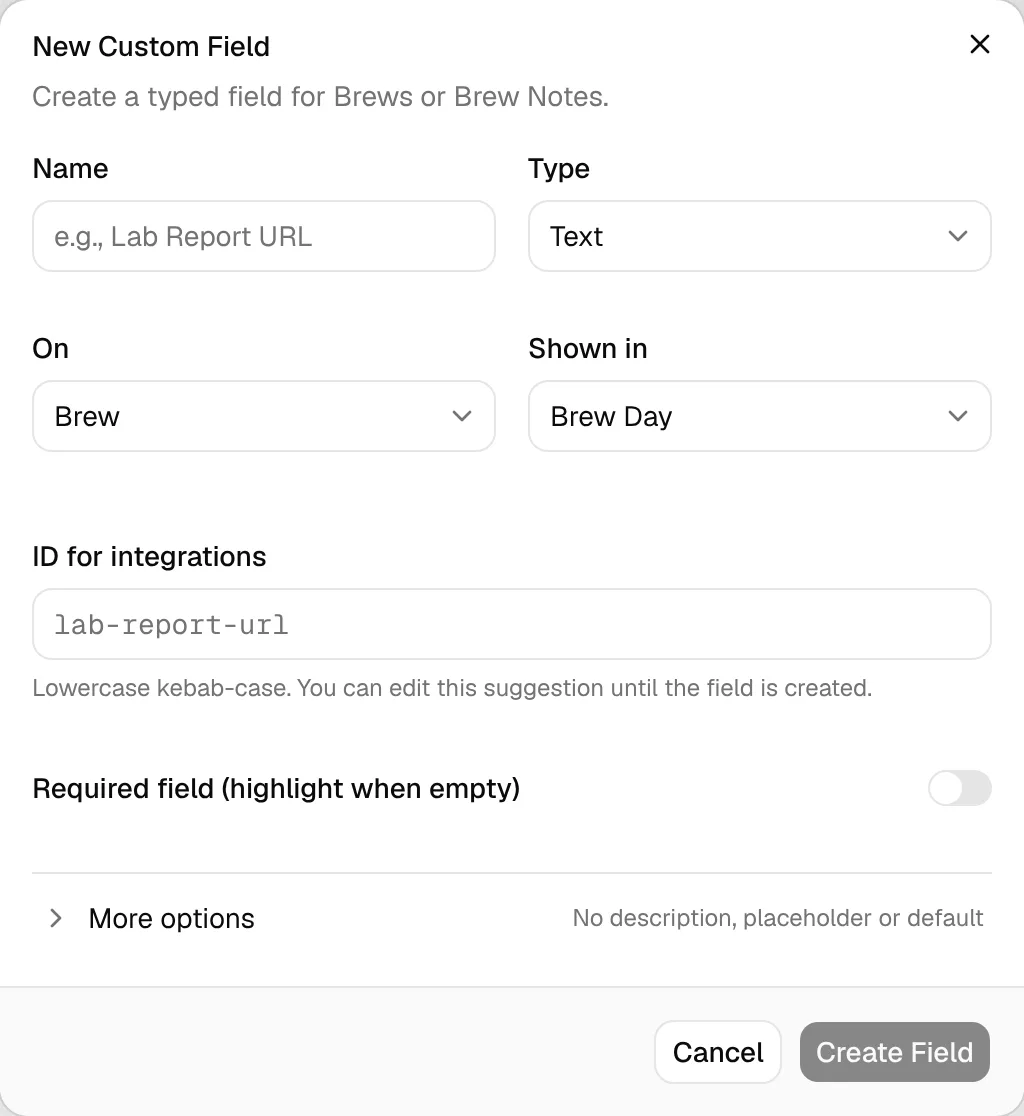
Enter a Name, for example "Lab Report URL". BrewForge suggests an ID for integrations from it (lab-report-url). You can change the ID until you create the field; afterwards it is fixed.
Choose the Type and what the field is On (see below). For brew fields, also choose where it is Shown in.
Optionally add a Unit (number fields) and switch on Required. A Description, Placeholder Text and Default Value are under More options.
Click Create Field.
Field types
| Field type | Stores |
|---|---|
| Text | Free text |
| Number | A decimal number, with an optional unit such as pH, °C or g/L |
| Integer | A whole number, with an optional unit |
| Date, Time, Date & Time | A date, a time of day, or both |
| Yes/No | A switch |
| Dropdown | One of a list of choices you define (at least two) |
| URL | A link |
Scope and placement
On decides what the field belongs to:
- Brew: one value per brew. Shown in decides in which part of the brew the field is shown: Brew Details, Brew Day, Fermentation, Packaging or Tasting.
- Brew Note: one value per brew note, filled in when you write a note. Brew note fields have no placement.
The Required switch works differently for the two scopes. A required brew field is highlighted while it is empty. A required brew note field must be filled in before the note can be saved.
Change a field
Click a field in the list to edit it. You can change the name, description, placement, unit, placeholder, default value and the required setting. The Type, what it is On and the ID for integrations can't be changed once the field exists, because values and integrations depend on them.
Dropdown choices that are already saved are read-only. To rename a choice, add the new one, then remove the old one. When you remove a choice, BrewForge shows how many brews and brew notes use it. Values that were already captured stay readable, but the choice is no longer offered for new values.
Archive, restore and delete
- Archive (in the edit dialog) hides a field from your brews without deleting anything. Archived fields are listed under N archived at the end of the tab, where you can Restore them.
- Permanently deleting (Delete… next to an archived field) is only possible for archived fields. BrewForge shows how many brews and brew notes have a value, and you confirm by typing the field's ID. The definition and every captured value are deleted, and the ID becomes free again.
If an integration still uses the ID of a deleted field and you later create a new field with the same ID, the integration will read the new field's data.
Custom fields in the API
Each field is identified by its ID for integrations. API tokens with the custom-fields:read scope can list the field definitions. See API tokens and the API reference.